About
In this section:
- What is Xhibit?
- How do I use Xhibit?
- Creating a theme for your whole institution
- Watch the Xhibit Launch Event
- What are people saying about Xhibit?
What is Xhibit?
Xhibit gives users of Xerte Online Toolkits the ability to produce a theme without having to write any HTML or CSS. It allows anyone to customise the appearance of their learning object within minutes, before bringing it into their live project.
Whether you want to change your colour schemes, backgrounds, fonts, icons or menus, Xhibit allows you to easily create any look-and-feel that you want for your next e-learning project.
Xhibit is the creation of James Roscoe and Joel Reed, who saw an opportunity to enable non-coders to customise the appearance of their Xerte objects (a process which, before Xhibit, required reasonable coding skills). Xhibit was first launched at the Xerte Conference held in April 2016 in Nottingham, and continues to be under development. Like Xerte, the project is completely free and open source.
How do I use Xhibit?
Step 1: Design
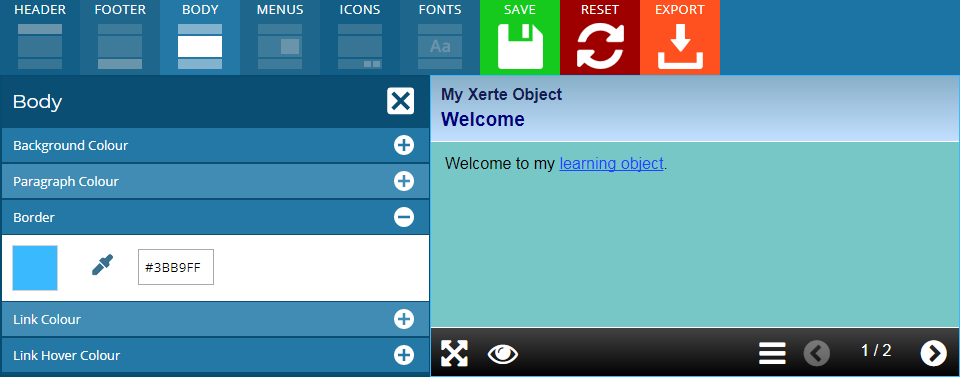
Click on Start Your Design to begin creating your own custom Xerte theme. Using the editing controls along the top, you can select particular areas of your learning object (e.g. header, body, footer) before targeting specific elements within those sections (e.g. paragraph colour).
You will be able to monitor the progress of your design in real-time via the Xerte preview window. Note that the preview window consists of just a single static sample page, and many of the usual interactive features of Xerte are not intended to work in this preview environment (e.g. slides changes or the accessibility menu).
You can capture a snapshot of your work-in-progress at any time via the 'Save' button, which will mean your theme automatically reloads the next time you visit Xhibit, allowing you to continue work on it. Note that you will need to revisit your theme from the same device and web browser that you saved it from in order for this feature to work.
As you make changes to your design, you may notice some WCAG colour contrast recommendations. These are in place to help you create the most accessible and user-friendly theme possible. We strongly encourage you take note of these recommendations, and if possible try to aim for a high colour contrast ratio across all your elements. Your end-users will really appreciate it!
You can also change the Xerte interface buttons by choosing from a selection of Font Awesome icons. Note that producing an Xhibit theme will implement Font Awesome icons by default (even if you haven't changed any), and this will therefore overwrite any existing icons that may be in place on your project (e.g. PNG icons). If you would prefer this didn't happen, you will need to manually remove the icons section from the generated Xhibit stylesheet before uploading it to your project.
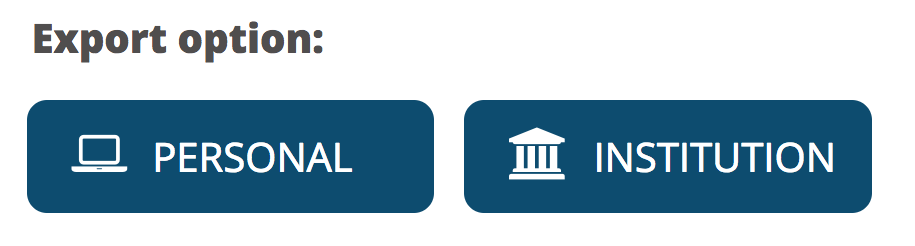
Step 2: Export
There are two export options available in Xhibit. Most users will wish to use the 'Personal' export option. Clicking on this option will allow you to save the theme to your computer in the form of a CSS file. This can then be attached to your project in Xerte Online Toolkits (see 'Step 3: Attach' below).
If you are accessing Xhibit from a mobile device, you may find that you don't have the ability to download the file. Some devices may show you the raw CSS code, in which case we advise copying this code to your clipboard and pasting it into an email to yourself so that you can save it into a CSS file manually via a computer at a later date.
There is also an option to export an 'Institution' theme, allowing Xerte admins to install a theme across an institution. For further information, see 'Creating a theme for your whole institution' further below.
Step 3: Attach
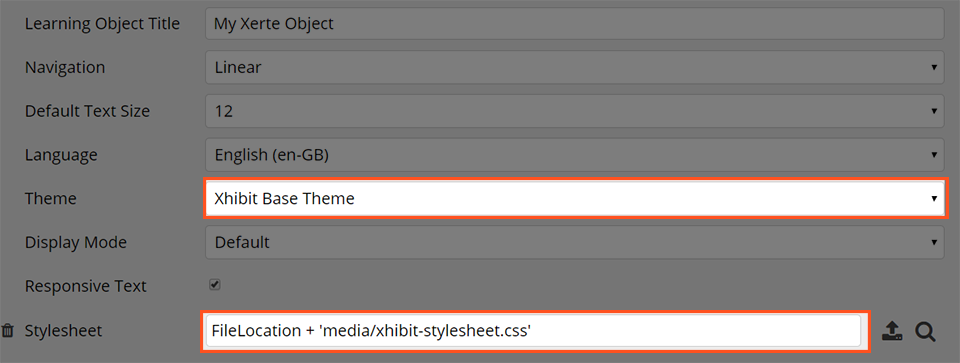
For your own personal projects within Xerte Online Toolkits, open the editor for your project, and then at the top-level add the 'Stylesheet' option via the Optional Properties. If you can't see the optional properties, click the arrow in the top-right of the editor.
Next, upload your Xhibit CSS file via the stylesheet upload feature, just like you would upload any other file in Xerte.
If you are using the most recent version of Xerte Online Toolkits, you should also choose the 'Xhibit Base Theme' option from the dropdown of installed themes. This will ensure that you are using the same base theme as xhibitapp.com, on top of which your own design will be placed. If you are using an older version of Xerte Online Toolkits, choose the standard 'Xerte Online Toolkits' theme instead, and most features should still work.
Creating a theme for your whole institution
It is possible to roll out a theme across your entire Xerte installation, allowing all users on the system to select it from the 'themes' dropdown in their Xerte editor. This can be useful for setting up a standard template for an entire department or organisation.
An institution theme must have a minimum of three files to work correctly:
- The theme stylesheet (.css)
- A screenshot of the theme (.jpg)
- A metadata file (.info)
By clicking the 'Institution' export button, Xhibit will generate all these files on your behalf and present them for download in a ZIP file. The ZIP file will need unpacking, and the files within must be placed within the existing themes > Nottingham directory of the Xerte installation on your web server, alongside the default themes.
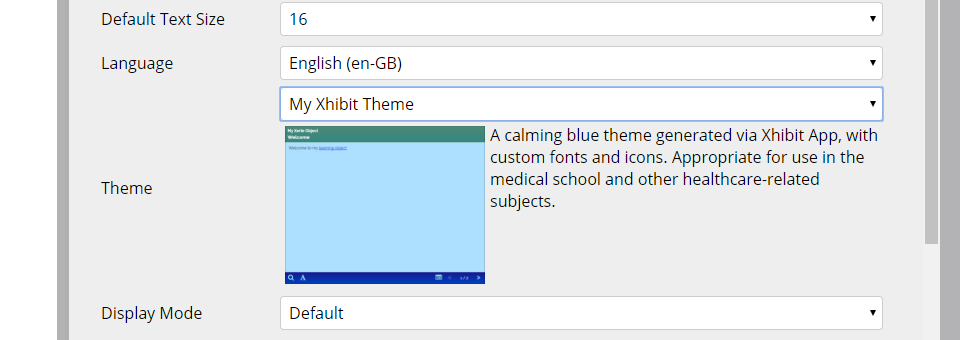
The text that you provide in the 'Theme name' and 'Description' fields on the Xhibit export window will be placed in the .info metadata file, and will be displayed to users (along with the screenshot) when they select the theme from the themes dropdown menu.
The installation process can only be done by a Xerte admin (i.e. somebody from your institution who has access to the server on which Xerte is installed), so if you don't have these permissions then you will need to send the theme's ZIP file to someone who does and ask them to place it on the server in the right location.
Once the theme has been added, all users at the organisation can apply it to their projects by selecting it from the 'Theme' dropdown in the Xerte editor, as shown below.
Note: We have successfully tested the institution theme export across all major, modern web browsers. There is a small issue on Internet Explorer and Safari browsers, whereby the screenshot does not output the theme's icons in the footer (this is due to a bug in an external plugin). While we wait for a fix for this bug, we suggest using an alternative browser if you wish the footer icons to be displayed.
So what are you waiting for? Start designing your theme today and create a great-looking Xerte theme within minutes. Any questions, comments, or feedback? Get in touch via our contact page. Good luck!
Watch the Xhibit Launch Event
You can watch a recorded demonstration below (including how to generate and attach a stylesheet) from the Xhibit Launch Event at the 2016 Xerte Conference.
Please note that video shows an earlier version of Xhibit, and therefore some features may vary. It also does not feature the 'Xhibit Base Theme' as described above, which should now be utilised on any up-to-date Xerte install.
What are people saying about Xhibit?
We've had a great response so far from the Xerte community. Take a look at just some of the comments from developers, learning technologists and educators who have seen what Xhibit can do:
Great!! A web app to create themes in Xerte. Very easy to use made by AgriFood ATP #xerte16
— Inge Donkervoort (@12ChangeLearn) 14 April 2016
I love it when talented people create a solution to an issue that makes technology more usable for all. @XhibitApp #xhibitapp #xerte16
— Kerry Pinny (@KerryPinny) 14 April 2016
@_JamesRoscoe @xhibitapp It looks a really good tool, I’m looking forward to using it
— Helen Davies (@HelenMD) 15 April 2016
Brilliant work guys, nice one! https://t.co/8xedwbatMj
— Xerte Project (@xerte_project) 25 January 2017
Well, @XhibitApp looks fabulous already - live preview is great! And more features to come https://t.co/SIvwg4q53m #xerte16 #XhibitApp
— Simon Wood (@MrSimonWood) 14 April 2016
Very neat, very usable! https://t.co/1HWonSzMAt
— Simon Thompson (@bizzypeople) January 26, 2017